This is a developer feature. You will not be able to leverage this functionality without writing code.
This guide walks through the steps to set up personalisation on an approval form to prefill it with data from the originally submitted form.
What this article covers
Configuring your form to use personalisation
Personalisation code
Testing the personalisation endpoint
Important: Before you begin
The article assumes you have already set up a new OneBlink Hosted API, along with the appropriate developer keys and roles. Both of these are required to continue with this guide. More information can be found for each at their respective pages.

Developer Keys: Developer Keys article

Introduction to setting up hosted API’s and to the SDK: SDK Docs
If you are using the code snippet, you will need both access and secret tokens that you generated before commencing this guide. These will be stored in the following constant variables.
const ACCESS_KEY = "YOUR_ACCESS_KEY";
const SECRET_KEY = "YOUR_SECRET_KEY";
Configure the Form Fields
The personalisation response must match element names in your form. You see the mapping section in the supplied code for this guide. Make sure your approval form has elements with those exact names.
Example mapping used in “personalisation.js”:
- “Name”
- “Email”
- “Pickles”
- “Tomato”
Fetch Original Submission Data
When an approval form opens, the personalisation endpoint will:
1. Use the approval ID to find the original submission
2. Fetch the submission data
// Find the original submission ID from the approval ID.

 const approvalId = body?.previousFormSubmissionApprovalId;

 let originalSubmission = {};


 try {

   const approval = await approvals.getFormSubmissionApproval(approvalId);

   const submissionId = approval?.formSubmissionMeta?.submissionId;

   const formId = approval?.formSubmissionMeta?.formId;


   // Load the submission data.

   if (submissionId && formId) {

     const submissionData = await forms.getSubmissionData(

       formId,

       submissionId,

       false,

     );

     originalSubmission = submissionData?.submission || {};

   }

 } catch (error) {

   return response

     .setStatusCode(500)

     .setHeader("content-type", DEFAULT_CONTENT_TYPE)

     .setPayload({ error: "Failed to fetch submission data." });

 }
Prefill Approval Form
Map the data from the original submission that needs to be prefilled into the approval form.
// Map repeatable set elements to access your required fields.

 const ingredients = Array.isArray(submission.Ingredients_)

   ? originalSubmission.Ingredients_.map((item) => ({

       Ham: item?.Ham,

       Pickles: item?.Pickles,

       Turkey: item?.Turkey,

       Lettuce_: item?.Lettuce_,

       Tomato: item?.Tomato,

     }))

   : [];


 // Build the submission data with the new fields mapped.

 const mappedSubmission = {

   Name: originalSubmission.Name,

   Email:originalSubmission.Email,

   Type: originalSubmission.Type,

   Ingredients_: ingredients,

 };
Configure your form to use personalisation
This flow is designed for approval forms, so make sure:
1. Your main form has an approval flow configured.
2. Your approval form has set up the following personalisation to receive submission prefill.
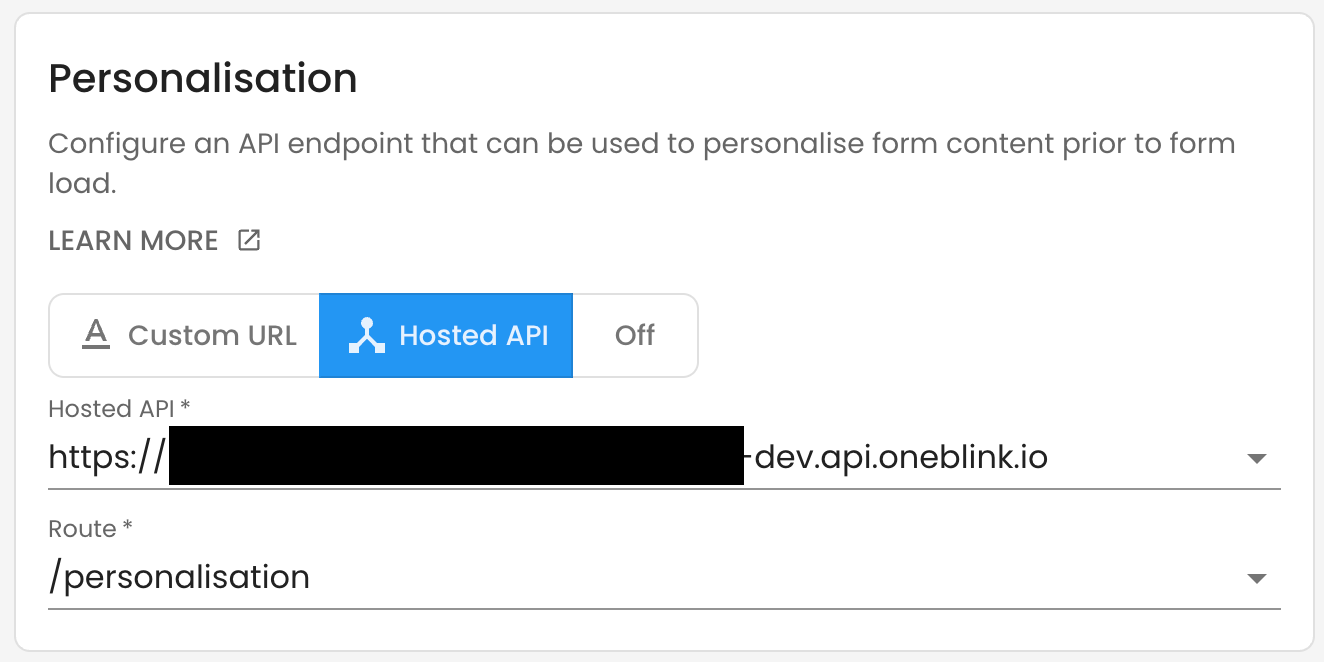
In the approval form:
1. Enable Personalisation, making sure to select between Custom URL or Hosted API
2. In this guide, we will be using a OneBlink Hosted API, so make sure to select Hosted API.
3. With your hosted API, ensure to set the following
- Select from the dropdown your hosted API
- Route: In this guide, we will be using the `/personalisation` endpoint that is part of the supplied code.
Full Code Example
Below is the link to the full example code: Example code
Common issues
“You do not have access to this service” Your key does not have Submission Data access.
“submissionData” is empty. Your key does not have Submission Data: Manager access.
Form not pre-filling. Check that the element name matches the keys in “submission”.
Getting Help
If you need any assistance with setting up developer keys, hosted API’s, or anything related to this guide, please reach out through the Report Issue menu or email support@oneblink.io.
Was this article helpful?
That’s Great!
Thank you for your feedback
Sorry! We couldn't be helpful
Thank you for your feedback
Feedback sent
We appreciate your effort and will try to fix the article